Monday, November 12, 2012

Bulk Trash Day - Rolling Chair

I think bulk trash day is my new favorite day of the month. Every 1st Monday of the month, my city has bulk trash day. This is where you can leave out ANYTHING and the city will come around and pick it up for you. The city will or I will...

I have turned Casey (my loving boyfriend) into a fan of this day as well... My brother in law also found some treasures this past Monday. People throw out anything, I mean anything! You just have to have a Krafty Karen eye to see the potential in the "trash". Some of the things we found, we didn't have to do a thing to other than wipe down and then post to sell. We have made about $20 so far off what Casey has picked up. Plus we have potential to make more as I get around to flipping some of the items.

Today I am going to share a chair with you. This chair was hideous, broken, dirty and Casey wanted to leave it on the side of the road. BUT, I made him pick it up. I have since changed his mind about this chair. I used things I had at home (fabric and paint) and flipped it from a piece of trash to something someone will buy. I have to say, I am very proud of this chair.

To begin, I took the chair apart as much as I could. I threw away the right arm of the chair because the left one was missing a piece. I then took the cushion and took the old fabric off. I found a pretty blue/turquoise piece of fabric in my Kraft room that was perfect size. I recovered it (using a staple gun). Then I went to town sanding down the chair. This actually didn't take to long, I usually make Casey sand everything down but he wasn't at the house that night and I didn't want to wait. After I sanded it down, I went on a hunt in my house to find paint. I found a black can and a brown can of paint... which the black had more paint in it so the black won. I have to say, I am pretty darn proud of my trashy chair!!!


Friday, November 9, 2012

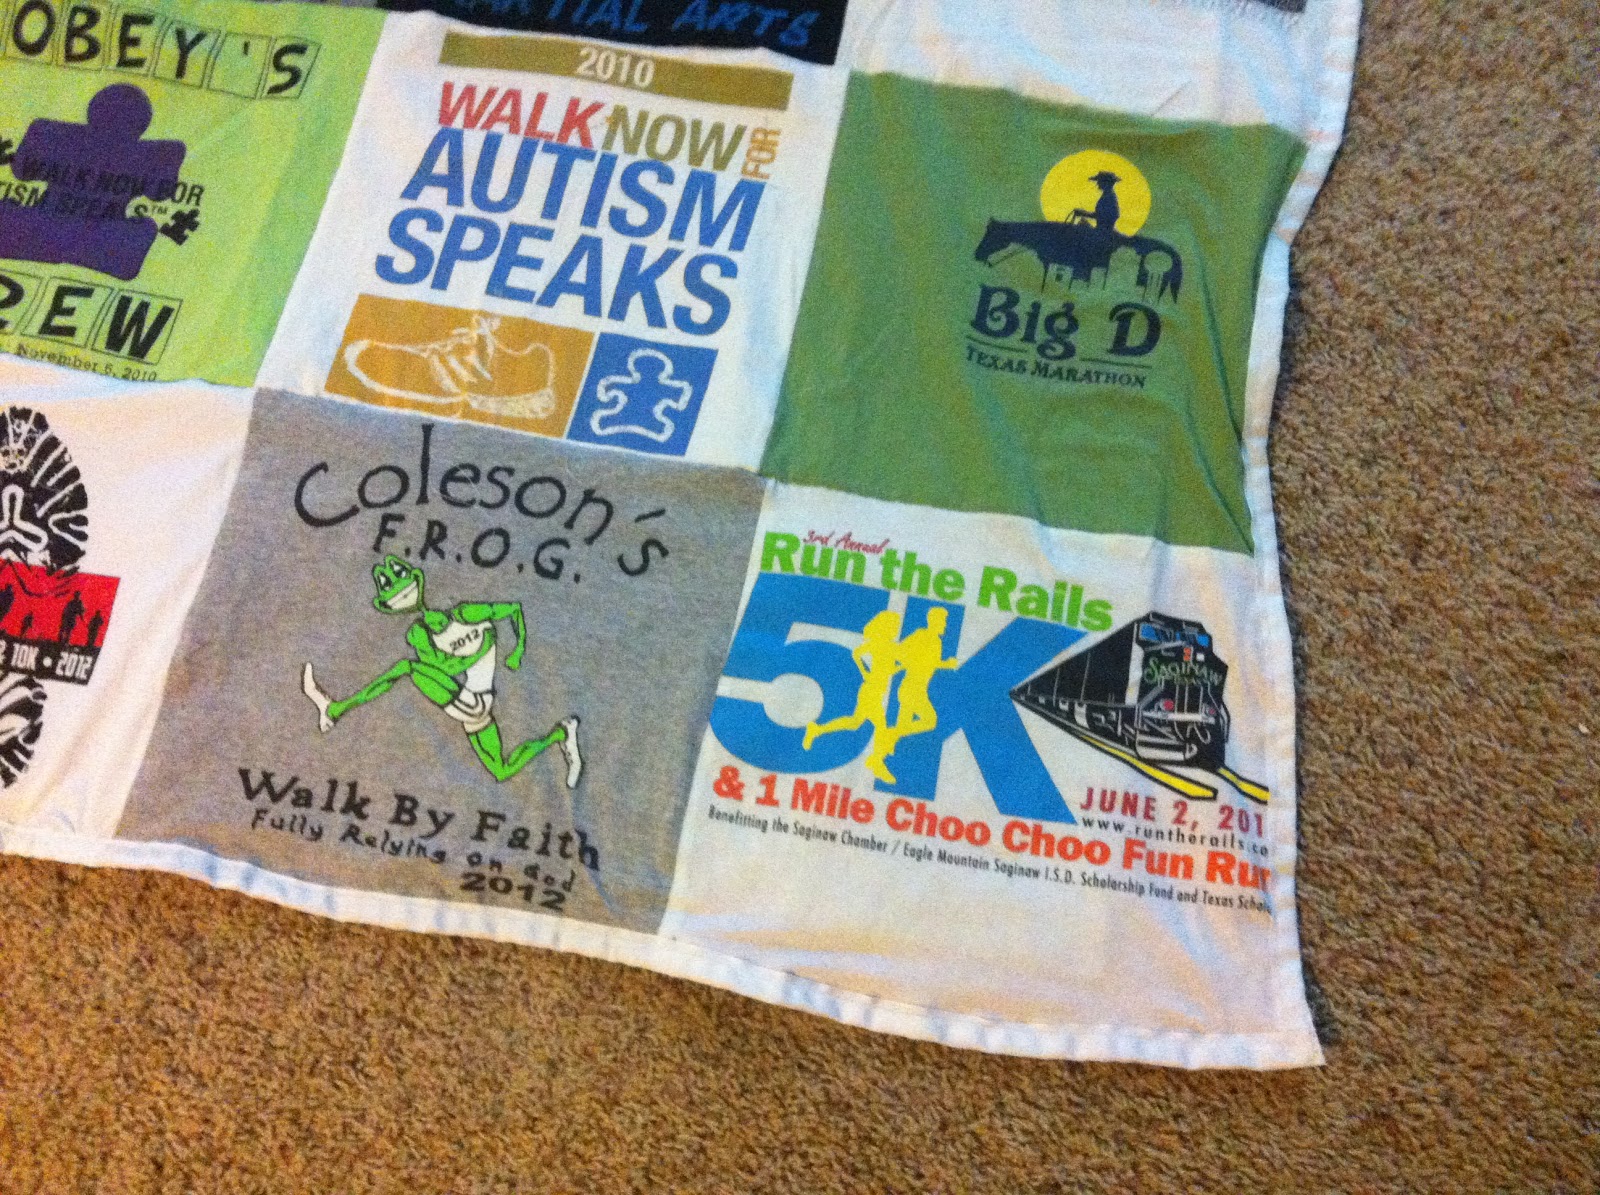
Lo's Race Blanket

A few weeks ago I started a race blanket for myself out of all my old 5k & 10k t-shirts. I still have to finish the binding on my blanket but I put that on hold to bless my wonderful trainer with a blanket for her!

To start I asked her to dig out 16 of her favorite race shirts (this included 2 shirts that she has run in honor of her son, 1 shirt that represents her business and 1 shirt that represents her trainer). I went to Hobby Lobby to find the backing and a zebra material caught my eye, it was so Lo! I had some pink material at home that I was going to use for the binding... well to fast forward a little bit, I didn't buy enough zebra material so I had to cut it into squares and sow them together and place 4 pink squares on the corners of the blanket. This left me with no binding on a Sunday (when Hobby Lobby was closed). I had to go to Wal-Mart and get creative. I ended up buying 2 spools of white 2 inch ribbon to use for the binding.

Okay with that being said, here is how I put the blanket together!!!

1. Find 16 shirts and cut them into 12 inch X 12 inch squares. Then sow 4 rows of 4 shirts together. After I sowed 2 rows of shirts together, I then sowed the rows together. I kept doing this until all 4 rows were sowed together. This makes up the front of your blanket

2. Cut the backing to the same size of the front of the blanket. If you like how this one looks, all I did was cut out 12 inch X 12 inch squares and sowed them together just like I did the front.

3. Place the front of the blanket on the ground face down, then place the batting down (I used the batting from Hobby Lobby that can be ironed on because this made it easier when I went to sow). Then place the back of the blanket onto of the batting and iron together.

4. Sow the 4 edges of the blanket together

5. Binding! This was actually easier than I though. You just fold the ribbon in half and then outline the blanket and sow it shut as close to the edge of the ribbon that you can.

6. Stand back and enjoy your master piece!

This took me 2 days to complete... about 3-4 hours each day! Its time consuming but really worth it when you see the outcome.


Monday, October 29, 2012

Homemade Mummy Costume - 1st place baby!

Me and my son have been going around and around with what he is going to be for Halloween. He keeps saying he wants to be a Fireman and I keep saying no (everything in our house and in our lives is about Fireman and so we need something different this one day)! I just couldn't think of WHAT. I enlisted the help of friends on Facebook and one of them mentioned a mummy. You see, I hate spending $20 (or more) on a plastic cheap looking costume that he will wear for a few hours and out grow before next year. When the mummy costume was mentioned, I quickly YouTube (http://youtu.be/JOV64Dr1tQE) directions on how to make one. It looked very simple and easy so off to the store I went.


How to make a Mummy Costume!!!

What you will need:
1 flat white sheet ($4.47)
White face make up (already had)
Black eyeshadow (already had)
1 long sleeve white shirt or turtle neck (already had)
1 pair of white tights ($1.97)

Step 1: Cut the sheet into 2 inch strips (I think I got about 30-40 out of a twin size sheet and it wrapped my 3 year old who is as tall as most 5 year old)

Step 2: Boil a pot of water and a couple of tea bags and then soak the strips in the pot

Step 3. Rinse the strips and then dab black paint in various locations of the strips

Step 4: Place in a pillow case (tied tightly with a ribbon) in the dryer

Step 5: Take the strips from the dryer and tie about 4 to 5 together, repeat 4 times. You should have some extra strips left over which will come in handy later

Step 6: Dress the child in the tights (put the tights over his/her shoes) and the white shirt. Make sure you tuck the shirt into the tights, this will really help you when your lil mummy has to potty.

Step 7: Start wrapping the child starting at his/her legs.
*Helpful hint - I did each leg and then made kind of a diaper looking wrap so it would be easy to take him to the bathroom. I then wrapped his chest and shoulders and went down each arm. I wrapped his head last. Oh and make sure you wrap them tightly and maybe use some safety pins so when they start walking it doesn't just fall off.

Step 8: Apply the white face make up and then go around the eyes and cheek bones with some black eyeshadow.

Step 9: Stand back and enjoy your master piece!!

My son won 1st place out of over 30 children at a costume party this past weekend. I am a very proud parent!!

Oh and side note: Wednesday at school they get to dress up and since the mummy costume is to hard to go to the potty in without help from me, Caleb will be a (drum roll please) Fireman! So really at the end of the day we both got our ways...


Thursday, October 18, 2012

Nautical Door Hanger

Down in the south, we have a thing we like to do where we make a cute wreath and hang it on the doors at the hospital after the baby is born. This lets other guest of the hospital know if you had a boy or a girl or heck one of each. Its a fun tradition and I love taking part in it. I have made one before (I will have to dig up the pictures) and enjoyed it so much that I decided I wanted to make another.

My boyfriends best friend/cousin (and his wife) are having a baby boy, due in December. They have decided to go with the nautical theme for the babies room (which is super adorable). So, I used their theme for the wreath... I went to Hobby Lobby (my favorite place on earth) and went to town picking out different ribbons. It was kind of hard at 1st because what I pictured in my head wasn't on the shelves! I had to really just start using my imagination... which I am glad I did because I am in love with the after product.

Oh and tip, make sure you go to Hobby Lobby when the ribbon is 50% off...


The "E" stands for their baby boys name, Easton!!

Wednesday, October 17, 2012

Kristy's baby shower

My sweet friend/co-worker Kristy is having a baby in just a few weeks! The exciting thing is that she is not finding out the sex until the baby is born (something which I could NEVER do because I am SUCH a planner). She did this with her 1st baby, a little boy! I am crossing my fingers its a girl but everyone else in the office is saying it is a boy.

Since she is not finding out the sex, planning a baby shower was kind of tricky. I didn't want to do any animals or just plain Jane colors. One day, I was going through Pinterest and the gender reveal parties were catching my eye. I came across an idea of where the guest pick mustaches and lips to show their guess of the baby. So, that is when I decided that the party would be a little man/little lady baby shower!!

I went to Hobby Lobby (my favorite store ever) and bought pink and blue card stock and printed out lips and mustache templates. I cut them each out and then taped them to a skinny rod (also bought at Hobby Lobby in a pack of 30). I put white tissue paper down in the bottom of a vase and then tied a pink and white bow around it (because I am guessing girl) and then stuck all the lips and mustaches inside. This will be my center piece for the table at the shower! And it will also serve for some really fun shower photos...


Wednesday, October 10, 2012

Go Cowboys!!!

I have wanted a game day dress since they 1st became popular but I have never wanted to pay the price of what they cost when it seemed so easy for me to make myself. I have put it off for a couple of seasons and then this year a fire was lite underneath me and I started making my own. My wonderfully sweet boyfriend bought me Cowboy pre-season tickets for my birthday and so the deadline was set.

I went to Goodwill and tried to find a Cowboys shirt, but had no luck so I ended up buying one at Wal-Mart on the clearance rack. It was a sleeveless shirt which was fine because I was going to end up cutting the sleeves off anyways. Then I went over Hobby Lobby (one of my favorite stores) and bought football material, I bought 2 yards. I also bought elastic and thread...

When I arrived back home, I went to work! I am one of those people that when I have a project, I get it done ASAP because I am so anxious to see the outcome. I found a really helpful site off Pinterest (http://littlemisssoutherncharm.blogspot.com/2011/07/game-day-t-shirt-dress-tutorial.html) and then followed each step until my dress was completed!!

Game day came and I wore my dress with Cowboy pride... Win Lose or Tie I am a Cowboys fan til I die!!!

Monday, October 8, 2012

Family Tree

One rainy day, Caleb and I were so bored and had really nothing to do. Days like that, I usually end up in my craft room searching for things to pop out at me and BEG me to use them. This particular day, I spoted a plain 8X11 white canvas that I had forgot all about (which is odd because when I buy something I usually use it that same day). I got on Pinterest and started searching for a projct we could do... We already did the crayon art and I didn't want him to just color on this canvas. I came across a wedding guest book where all the guest put a thumb print on a "family tree" that had been painted onto the canvas. So neat!

I decided to do a Family Tree for me and Caleb! I went to work drawing the tree (while Caleb took a nap of course). I drew the tree in pencil and then went back over it with a brown fine tip marker. Anywhere the pencil showed through, I erased it and smeared it around the "branches"... it gave it a really cool shadow effect. I actually messed up a branch and made a heart out of it, so I decided to incorporate that into the tree as well.

I was finished and when Caleb woke up we went to town stamping our thumbs into ink and making our family tree complete. If you look at the bottom right hand corner you will see a green looking heart. Well, Caleb decided to touch the canvas there with his thumb so I got cleaver and put mine next to his and made a heart out of it.

It was a fun craft to be able to share with Caleb and something I will cherish all of my days! Oh and it was VERY inexpensive!!!


My co-workers liked my family tree so much that they decided to do a work tree for my bosses birthday. Each one of us in our group stamped our thumb prints (on a tree I drew) and then put our initals by them! ***Key, make sure you use a good ink and a dark color. One girl used pink on my bosses tree and it has since faded.