Thursday, March 7, 2013

Faux Canvas Photos

I haven't blogged in a while because I have been one busy little girl... My sweet loving wonderful boyfriend proposed to me last month and well, I said YES!!! On top of that, we just moved into a house together. Talk about all the fun projects I have on my plate right now with both of those events.

With the wedding, I am trying to do everything myself... the planning, the invites, the decor and more. With the house, I have been trying to update a few pieces I already have and then add a few more things to hang on the walls since we have SO much more wall space now. This is where lovely Pinterest comes in handy... I am going to TRY and keep up with blogging what I create while I finish setting up our new house and while I plan our wedding.

Today I want to show you something I did for over our mantel. This past Christmas, Casey, Caleb and myself went to the Stockyards and had our pictures made. We had one done of our boots and since I received the picture back from the photographer, I have been wanting to hang it over the mantel. When we moved into the new house, I knew I had to get that picture hung ASAP or it would never get done. Casey took me to Home Depot and bought me a huge piece of foam board... that was fun carrying it to the car because it was an EXTRA windy day! We then made a pit stop at Hobby Lobby (my home away from home) and I picked up some more spray adhesive. The picture was already at home, I printed out an engineer print from Staples awhile back.

Here is how you make this mock/faux canvas:

What you will need:
Foam Board - in the installation aisle where the sheet rock is at Home Depot
Spray Adhesive
Engineer Print from Staples
Straight Edge
Ruler
Pencil

How to make it:
Step 1. Cut the picture out with your straight edge

Step 2. Turn the photo upside down and measure 1/2 inch from the edge and mark it on each side and then connect the marks to make a box around the edge. So basically leaving a 1/2 border on each side.

Step 3. Cut out of piece of the foam board so that it fits the square you just made on the backside of the picture. You want the border to hang off the foam board because that is how you will cover the sides of the board.

Step 4. Lay the photo how you want it positioned on the foam board and pick up one corner and spray the adhesive and smooth out the photo. If you start with a corner instead of spraying the whole board, it makes it easier to keep the picture straight.

Step 5. After you have the picture glued down, start working on gluing down the edges

Step 6. I used a coke tab and hot glued it to the back so that I could hang the photo... worked like a charm!

Here are 2 photos I have done so far!!


I loved how the boots turned out that I wanted to make one for my son's room. I showed him a couple of photos from his Firefighter birthday party last fall and let him pick one to hang in his room. His room is decorated as a fire station and has a couple of the photos framed so there were only a handful to chose from. He has a corner of his walk in closet dedicated to his Dad's side of the family... pictures, books about Dad's, small trinkets, etc. But he said he wanted a BIG photo of his Momma and Daddy on his wall... so I made him one! Love how it turned out... I ordered a "Presentation Photo" from Staples because I wanted a colored photo instead of black and white.

Monday, December 31, 2012

Pitter Patter Plates

I hope you all had a very Merry Christmas with your family, I know I loved spending my time off with my loved ones. My son (Caleb, age 3) really got into Christmas this year... which made it that much better. Plus on top of everything, we had a white Christmas! This is my 2nd white Christmas in 27 years of life... this is also Caleb's 2nd white Christmas in 3 years of life. Ha, gotta love Texas!
This holiday season, Casey (my boyfriend) and I really have been trying to cut back and save some money. We tried to think of some good presents people would cherish but that wouldn't cut the bank. That is when I came up with Pitter Patter Plates! With each plate, I expanded my business and I have decided to make this more of a side job than just a gift giving skill I have.

If you see a plate you like, let me know and for $20 I can recreate that plate and send it to you (anywhere you are) complete with a stand. Or, if you have a favorite quote, saying, picture, etc. Let me know and I will make it come to life on a decorative custom plate!

Contact me if you are interested in buying a plate!


Tuesday, December 4, 2012

Old School Desk

My 7 year old niece is OBSESSED with playing school. Over Thanksgiving break, I brought her up to work and let her play in one of our empty offices. She loved having her name on the door (she made her own sign), having her own phone (that I unplugged), her own rolling chair, desk and white board. I even made her a mock badge like the one I use to turn my computer on and open doors in my building. She was in heaven.

I asked her what she wanted for Christmas and she told me that all she wanted me to buy her was "tons of teacher stuff"... I planned on going to a local teacher store and stocking her up on some books but I wanted to do something else too. That is when I came across the idea of redoing an old school desk for her! I found one on Craigslist for $30. I had my brother in law go with me and pick it up, it was perfect! In great condition and very sturdy.


When I got it back home, I started sanding the desk down (after I took it apart of course). My sister and I had found a design we really loved (chevrons) so I started to map it out.

Step 1: I got a ruler and made a grid like pattern on the top of the desk (and the seat). Each little box is about 2 inches by 2 inches.


Step 2: I started to play connect the dots. If you look at the bottom, I messed up and had to fix it some. I went 2 up and 2 down and thought I could do it the whole width of the board, well I ran out of room and it looked kinda of odd so in the middle I went 1 1/2 down instead of 2 down. You will just have to play with your grid and draw your lines to where they look perfect to you.


Step 3: This is where most people would tell you to tape it off... well, I didnt have any tape so I started to free hand and well it turned out really nicely! I used the edge of my ruler to make sure I didnt go over into the next line. Paint every other line the same color (or if you want you can paint them each a different color)


Step 4: Paint the second color! Remember if you need help, just use the straight edge of the ruler... or tape it off.

Step 5: I put the desk back together (after I finished painting everything else of course)!


I can NOT wait until Christmas day when I get to watch my niece open this gift, she is going to be so excited. Now, I just need  to call up Home Depot and have them save me a washer or dryer box so that I can wrap it!

Love,
Krafty Karen


Monday, December 3, 2012

More fun with Eddie the Elf

Since I have last blogged, Eddie the Elf has been very active in our house. Every morning, Eddie is one of the reasons Caleb is so "easy" to get out of bed. I go in his room and whisper, "Hurry come quick, see what Eddie is doing... it is SO funny!" If you know me at all, you know I am very dramatic and well when Caleb finds the Elf, nothing changes! I put on a huge show about how funny and silly Eddie is... Caleb quickly feeds off my excitment.

You ready to see what Eddie has been up to?!

Eddie coloring Caleb a picture

Eddie brought Caleb a snowman stuffed animal who helped Eddie read a book to all of Caleb's "friends"

When Caleb saw this he said "I see a 'C' and an 'A', what else does it say?" And then he stole a few beans and took them to school to show his teacher. I am now aware that kids are NOT allowed to take beans to school... oops! 

I guess after a week of traveling back and forth from our house to the North Pole, Eddie needed a shower! Caleb has been saying for the past week (when we would hunt for Eddie) that he thought Eddie was in the bathtub, well this morning he was RIGHT!!


In our house we believe in 3 things... God, Santa and the Dallas Cowboys! I think Eddie helped them pull off a win against the Eagles last night!

I guess Eddie ran into some trouble with Caleb's Army men! Caleb was very mad at his Army men for tying Eddie up, he was so mad the he knocked all his Army men down and told them to leave his friend Eddie alone! Love that sweet baby boy!

Stay tuned for more mischief from Eddie as the month goes on!

22 more days until Santa comes!!!

Monday, November 26, 2012

Eddie the Elf

This year I decided that Caleb is now old enough to understand the concept of the Elf on the Shelf, so I purchased him one. I have been waiting a very long time to start this tradition and I am so happy that the time is finally here. In my house, we start decorating and celebrating Christmas the day after Thanksgiving. My boyfriend, Casey, had to work the day after so we decided to put the tree up and decorate it when we finished Thanksgiving dinner with his family. It was fun making those memories with 2 guys I really love (Casey and Caleb). Caleb being 3, has really gotten into the whole Christmas spirit. He loved decorating, he helped hang the Christmas lights on the house (even requested some be hung in his room), traded in his favorite blanket for a snowman blanket and has been wearing his Santa hat EVERY!!


I could go on and on about how excited he is, but this blog isn't about that... it is about how his momma, Krafty Karen, has teamed up with Eddie the Elf to make this Christmas a magical one.

Day 1: Eddie showed up at the house, we read the book, watched the movie and then I explained to him how important Eddie is. Caleb really understood, it was a proud Momma moment!

Day 2: Caleb woke up and found Eddie zip-lining through the house. His exact words were "Eddie is JUST like Buzz Lightyear!"


Day 3: Caleb looked all over the house and couldn't find Eddie, then he said "Maybe he is taking a bath" and went to the bathroom to find Eddie had pulled out his old training potty and had "pooped" M&M's... which Caleb LOVED eating.

Day 4: Caleb was in a BAD mood this morning, so much that I had to carry him to the living room and lay him on the couch. BUT when he noticed Eddie had put toilet paper all over the tree, he began to cheer up. Thanks Eddie, you saved this Momma a headache!!
I will continue to post pictures of how silly Eddie is over the next couple weeks, so stay tuned! Oh and if you have any cute ideas, leave me some comments and I will pass them on to Eddie!

Toodles,
Krafty Karen

Monday, November 12, 2012

Bulk Trash Day - Rolling Chair

I think bulk trash day is my new favorite day of the month. Every 1st Monday of the month, my city has bulk trash day. This is where you can leave out ANYTHING and the city will come around and pick it up for you. The city will or I will...

I have turned Casey (my loving boyfriend) into a fan of this day as well... My brother in law also found some treasures this past Monday. People throw out anything, I mean anything! You just have to have a Krafty Karen eye to see the potential in the "trash". Some of the things we found, we didn't have to do a thing to other than wipe down and then post to sell. We have made about $20 so far off what Casey has picked up. Plus we have potential to make more as I get around to flipping some of the items.

Today I am going to share a chair with you. This chair was hideous, broken, dirty and Casey wanted to leave it on the side of the road. BUT, I made him pick it up. I have since changed his mind about this chair. I used things I had at home (fabric and paint) and flipped it from a piece of trash to something someone will buy. I have to say, I am very proud of this chair.

To begin, I took the chair apart as much as I could. I threw away the right arm of the chair because the left one was missing a piece. I then took the cushion and took the old fabric off. I found a pretty blue/turquoise piece of fabric in my Kraft room that was perfect size. I recovered it (using a staple gun). Then I went to town sanding down the chair. This actually didn't take to long, I usually make Casey sand everything down but he wasn't at the house that night and I didn't want to wait. After I sanded it down, I went on a hunt in my house to find paint. I found a black can and a brown can of paint... which the black had more paint in it so the black won. I have to say, I am pretty darn proud of my trashy chair!!!


Friday, November 9, 2012

Lo's Race Blanket

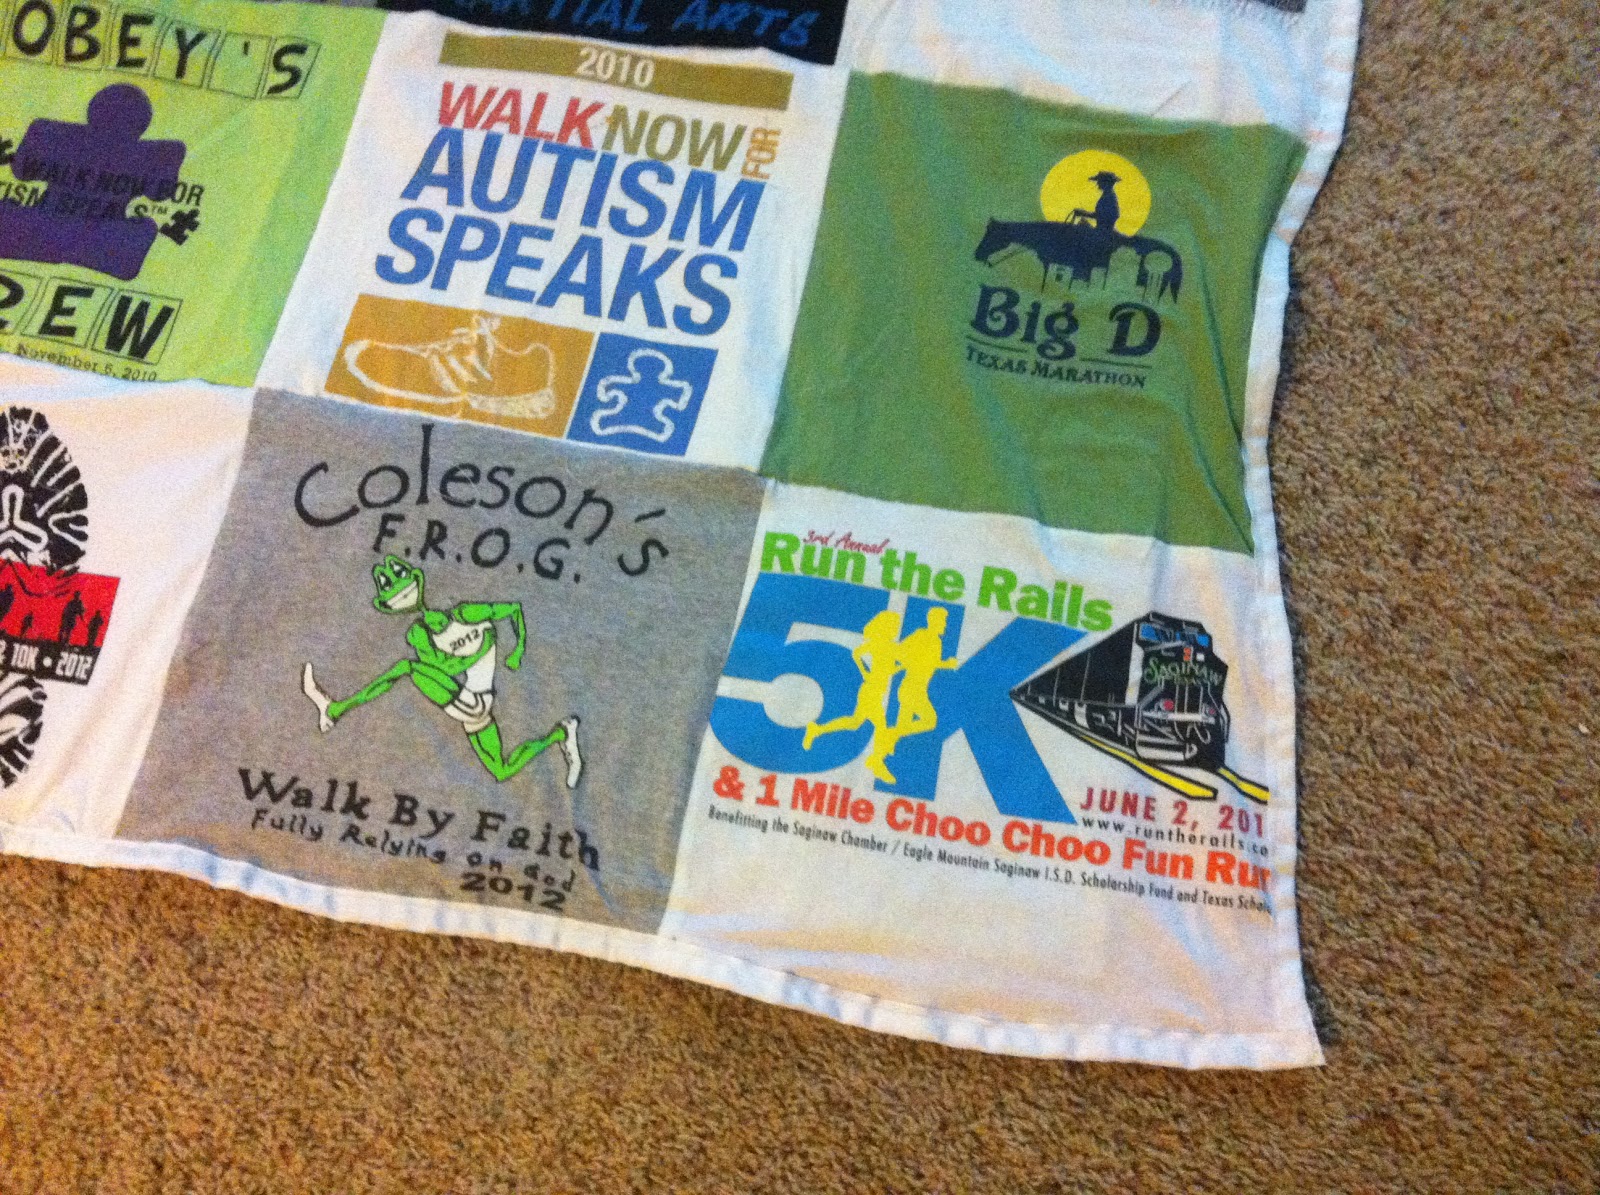
A few weeks ago I started a race blanket for myself out of all my old 5k & 10k t-shirts. I still have to finish the binding on my blanket but I put that on hold to bless my wonderful trainer with a blanket for her!

To start I asked her to dig out 16 of her favorite race shirts (this included 2 shirts that she has run in honor of her son, 1 shirt that represents her business and 1 shirt that represents her trainer). I went to Hobby Lobby to find the backing and a zebra material caught my eye, it was so Lo! I had some pink material at home that I was going to use for the binding... well to fast forward a little bit, I didn't buy enough zebra material so I had to cut it into squares and sow them together and place 4 pink squares on the corners of the blanket. This left me with no binding on a Sunday (when Hobby Lobby was closed). I had to go to Wal-Mart and get creative. I ended up buying 2 spools of white 2 inch ribbon to use for the binding.

Okay with that being said, here is how I put the blanket together!!!

1. Find 16 shirts and cut them into 12 inch X 12 inch squares. Then sow 4 rows of 4 shirts together. After I sowed 2 rows of shirts together, I then sowed the rows together. I kept doing this until all 4 rows were sowed together. This makes up the front of your blanket

2. Cut the backing to the same size of the front of the blanket. If you like how this one looks, all I did was cut out 12 inch X 12 inch squares and sowed them together just like I did the front.

3. Place the front of the blanket on the ground face down, then place the batting down (I used the batting from Hobby Lobby that can be ironed on because this made it easier when I went to sow). Then place the back of the blanket onto of the batting and iron together.

4. Sow the 4 edges of the blanket together

5. Binding! This was actually easier than I though. You just fold the ribbon in half and then outline the blanket and sow it shut as close to the edge of the ribbon that you can.

6. Stand back and enjoy your master piece!

This took me 2 days to complete... about 3-4 hours each day! Its time consuming but really worth it when you see the outcome.